You don't need State Managment libraries in Flutter
flutter dart bloc riverpod tutorials state management provider value notifier
Flutter already has a lot of built-in tools to manage state like setState or ChangeNotifier. You don’t need to use external libraries like bloc, provider, riverpod, etc. to manage simple state in your Flutter app.
In this article, I will show you how to manage state in Flutter without using any external libraries, and avoid the complexity that comes with them, when the built-in tools are enough for most use cases.
ValueNotifier
Every state management library solution in Flutter, including popular ones like bloc, provider, and riverpod, is built around the observer pattern.
The observer pattern is a software design pattern in which an object, called the subject, maintains a list of its dependents, called observers, and notifies them of state changes, typically by calling one of their methods.
In Flutter, the simplest implementation of this pattern is ValueNotifier, a class in Flutter that holds a value and notifies its listeners when the value changes.
To learn more about ValueNotifier, you can refer to the official Flutter documentation.
Example
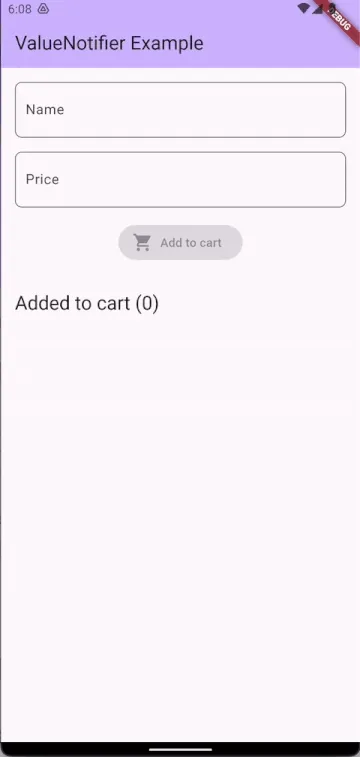
Let’s create a simple shopping cart app to demonstrate how to use ValueNotifier to manage state in Flutter.

Creating the product model
First, create a Product class to represent a shopping cart product.
Note that the Product class extends Equatable to implement value based equality.
This means that two Product instances are considered equal if their properties are equal. More on this in the Equatable package documentation.
@immutable
class Product extends Equatable {
  const Product(this.name, this.price);

  final String name;
  final double price;

  // Implementing Equatable to compare objects by value.
  @override
  List<Object?> get props => [name, price];

  bool get isEmpty => name.isEmpty || price == 0;

  Product copyWith({
    String? name,
    double? price,
  }) {
    return Product(
      name ?? this.name,
      price ?? this.price,
    );
  }
}
Creating the ProductFormNotifier
Let’s create our first ValueNotifier to manage the product form state.
This notifier will hold the current product being edited in the form.
// Global instance of ProductFormNotifier
final $productFormNotifier = ProductFormNotifier();

class ProductFormNotifier extends ValueNotifier<Product> {
  // The initial value of the notifier is an empty product
  ProductFormNotifier() : super(const Product('', 0));

  void setName(String name) {
    value = value.copyWith(name: name);
  }

  void setPrice(double price) {
    value = value.copyWith(price: price);
  }
}
We need to update the value of the ValueNotifier to notify its listeners.
We can do this by calling the value setter.
This value has to be a new instance of the product, so we use the copyWith method to create a new instance of the product with the new value.
As the docs for ValueNotifier say:
When the value is replaced with something that is not equal to the old value as evaluated by the equality operator ==, this class notifies its listeners.
Creating the CartNotifier
Next, let’s create a ValueNotifier to hold the list of products in the shopping cart.
// Global instance of CartNotifier
final $cartNotifier = CartNotifier();

class CartNotifier extends ValueNotifier<List<Product>> {
  // The initial value of the notifier is an empty list
  CartNotifier() : super(const []);

  void add(Product product) {
    value = [...value, product];
  }

  void remove(Product product) {
    value = value.where((c) => c != product).toList();
  }
}
We update the value to a new instance of the list, so we use the spread operator ... to create a new list with the new product, or
we use the where method to filter out the product we want to remove from the list.
Creating the UI
Now let’s create a simple UI to display the product form.
class ProductForm extends StatelessWidget {
  const ProductForm({super.key});

  @override
  Widget build(BuildContext context) {
    return Padding(
      padding: const EdgeInsets.all(16.0),
      child: Column(
        mainAxisSize: MainAxisSize.min,
        children: [
          TextField(
            // We use the setName method of the global instance of ProductFormNotifier
            // to update the name of the product
            onChanged: (value) => $productFormNotifier.setName(value),
            decoration: const InputDecoration(
              labelText: 'Name',
            ),
          ),
          const SizedBox(height: 16),
          TextField(
            // We use the setPrice method of the global instance of ProductFormNotifier
            // to update the price of the product
            onChanged: (value) =>
                $productFormNotifier.setPrice(double.tryParse(value) ?? 0),
            keyboardType: TextInputType.number,
            decoration: const InputDecoration(
              labelText: 'Price',
            ),
          ),
          const SizedBox(height: 16),
          ValueListenableBuilder(
            valueListenable: $productFormNotifier,
            builder: (context, product, _) {
              return ElevatedButton.icon(
                icon: const Icon(Icons.shopping_cart),
                onPressed:
                    // If the product is empty, we disable the button
                    product.isEmpty ? null : () => $cartNotifier.add(product),
                label: const Text('Add to cart'),
              );
            },
          ),
        ],
      ),
    );
  }
}
In this UI, we have two TextField widgets to input the name and price of the product. We use the onChanged callback to update the product form state when the user types in the TextField.
We also have a ValueListenableBuilder widget to listen to changes in the product form state. This widget rebuilds the UI whenever the product form state changes.
You may find similarity between ValueListenableBuilder and Consumer from provider or BlocBuilder from bloc package, and that’s because they are all built around the same principle of the observer pattern. These widgets ensure that only the builder function is rebuilt when the value changes, avoiding unnecessary rebuilds.
// .....
  ValueListenableBuilder(
    valueListenable: $productFormNotifier,
    builder: (context, product, _) {
      return ElevatedButton.icon(
        icon: const Icon(Icons.shopping_cart),
        onPressed:
            // If the product is empty, we disable the button
            product.isEmpty ? null : () => $cartNotifier.add(product),
        label: const Text('Add to cart'),
      );
    },
  ),
// .....
Now let’s create a simple UI to display the products in the shopping cart.
class ProductList extends StatelessWidget {
  const ProductList({Key? key}) : super(key: key);

  @override
  Widget build(BuildContext context) {
    return ValueListenableBuilder(
        // Here we are listening to the global instance of CartNotifier
        valueListenable: $cartNotifier,
        builder: (context, products, _) {
          return ListView(
            shrinkWrap: true,
            children: products
                .map((product) => ProductItem(product))
                .toList(growable: false),
          );
        });
  }
}
The ProductList widget listens to changes in the shopping cart state using the ValueListenableBuilder widget. This widget rebuilds the UI whenever we add or remove a product from the shopping cart.
class ProductItem extends StatelessWidget {
  const ProductItem(this.product, {Key? key}) : super(key: key);

  final Product product;

  @override
  Widget build(BuildContext context) {
    return ListTile(
      title: Text(product.name),
      trailing: IconButton(
        // We use the remove method of the global instance of CartNotifier
        // to remove the product from the cart
        onPressed: () => $cartNotifier.remove(product),
        icon: const Icon(Icons.remove_circle),
      ),
      subtitle: Text('\$${product.price}'),
    );
  }
}
The ProductItem widget displays the name and price of the product in a ListTile widget. We also have an IconButton widget to remove the product from the shopping cart.
Finally, let’s create the main app widget to display the product form and the shopping cart.
class MyHomePage extends StatelessWidget {
  const MyHomePage({super.key, required this.title});

  final String title;

  @override
  Widget build(BuildContext context) {
    return Scaffold(
      appBar: AppBar(
        backgroundColor: Theme.of(context).colorScheme.inversePrimary,
        title: Text(title),
      ),
      body: Column(crossAxisAlignment: CrossAxisAlignment.start, children: [
        const ProductForm(),
        Padding(
          padding: const EdgeInsets.all(16.0),
          child: ValueListenableBuilder(
              valueListenable: $cartNotifier,
              builder: (context, products, _) {
                return Text(
                  // We are displaying the number of products in the cart
                  'Added to cart (${products.length})',
                  style: Theme.of(context).textTheme.titleLarge,
                );
              }),
        ),
        const Expanded(child: ProductList()),
      ]),
    );
  }
}
That’s it! We’ve created a simple shopping cart app using ValueNotifier to manage state in Flutter without using any external libraries 🎉.
You can find the complete code for this example on GitHub
Conclusion
Remember, when it comes to state management in Flutter, it’s important to choose the approach that best fits your app’s needs and complexity. While libraries like bloc, provider, and riverpod offer powerful features and abstractions, sometimes a simpler solution like ValueNotifier can be sufficient.
By using ValueNotifier, you can manage state in your Flutter app without relying on external libraries. It provides a lightweight and straightforward solution for managing state, avoiding the complexity and boilerplate code that can come with using additional libraries.
In my opinion, this use case fits best when you have a small to medium-sized app with simple state management requirements, otherwise, you might want to consider using a more advanced state management solution and patterns like Bloc + rxdart wich I cover in another article.
Regardless of the approach you choose, the most important thing is to understand the principles behind state management in Flutter and choose the solution that best fits your app’s requirements.
I hope you found this article helpful. If you have any questions or feedback, feel free to contact me on Twitter or email me at mail@lorensala.com
Happy coding! 🚀